Spotted Floral Black & Beige
From $153.00
The oversized floral pattern creates an eye catching design
Spotted Floral Black & Beige
Spotted Floral has become a firm favourite with designers around the world. The oversized floral patterns create an eye catching design that will turn your roller blind into a room feature.
This pattern comes in screen, light filtering and blockout blind materials. If you require custom colours for your blind, please contact us.
FAST & RELIABLE DELIVERY
Delivery is standard $35 for orders under $299. Delivery is free for orders over $299.
All of our blinds are Australian made, so you can expect delivery within 14 business days. During busy periods our delivery time frames can extend out to 15 business days however we will be sure to let you know if this is likely to happen.
AUSTRALIA WIDE DELIVERY
We use reputable delivery companies that cover everywhere in Australia.
Note that additional costs will apply for regional and remote areas. Please contact us directly by live chat, phone or email for more information.
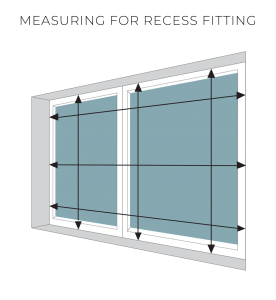 Measuring for Recess Fitting
Recess fitting is appropriate if you want your blind to be installed inside the window recess. This allows your window frame to be exposed and gives a ‘built-in’ look. To take the measurements for your blind, measure the full width and height of the recess [the size of the hole] and we will make the appropriate deductions to ensure your blind fits perfectly.
Please note that for recess fitting blinds, there will be a small gap (roughly 15mm) at the top, left and right sides which will allow a small amount of light in. This is due to the fitting of the blind bracket. For more effective room darkening we suggest choosing a face fitting blind. Please see information below regarding face fitting.
Tips:
Please use a metal tape measure. Plastic ones and cloth ones can sometimes give inaccurate measurements.
Take measurements in millimetres
Take your measurements in at least 3 places for both the width and the drop. Use the smallest measurements when you enter into our website.
Don’t make any deductions, we will do that for you to ensure your blind fits perfectly
Always double check your measurements
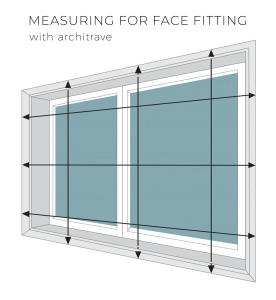 Measuring for Face Fitting (Measuring for an Architrave)
Face fitting is where the blind is installed to the face of the window (as opposed to inside the window recess).
When you want to fit the blind to the window’s architrave, measure the width from the outer edge of the architrave to the opposite edge. Then measure the drop from the top of the architrave to where you would like the blind to finish.
When producing your blind, we do not take any deductions from your measurements. The blind will be produced to your measurements.
Tips:
Please use a metal tape measure. Plastic ones and cloth ones can sometimes give inaccurate measurements.
Take measurements in millimetres
Always double check your measurements
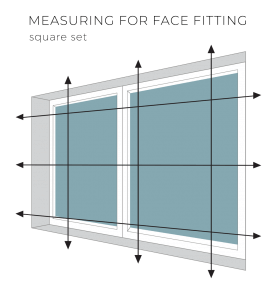 Measuring for Face Fitting (Measuring for Square Set)
This is the measurement you need to take if you want the blind to hang outside the recess overlapping the window (where there is no window architrave). In this case we will make the blind to your specified size with no deductions.
Measure the exact width of the area you would like the blind to overlap. To minimize light leakage we recommend that the blind overlaps the window recess by at least 70mm at the top and 50mm each side. We will produce the blinds to the exact measurements you provide to us.
The overlap at the bottom of the blind is a matter of personal choice but if you are measuring for a blind that will come down to the floor allow 10-20mm of clearance.
Tips:
Please use a metal tape measure. Plastic ones and cloth ones can sometimes give inaccurate measurements.
Take measurements in millimetres
Always double check your measurements
Our blinds are very easy to install. Alternatively one of our install partners can install your blind for you. Note that additional costs will apply. Please contact us directly by live chat, phone or email for more information.
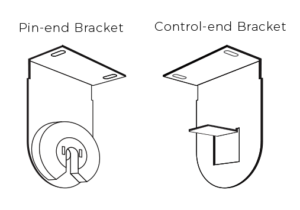
What you will need to install your blind is a drill, appropriate drill bit, phillips head screwdriver, level and pencil. What you will receive from us (besides the blind of course) is a pin-end bracket, a control-end bracket, a child safety device, 4 x screws, 4 x plasterboard anchors for when you are attaching your blind to plasterboard and 4 x masonry plugs for when you are attaching your blind to brick/concrete etc.
Before you install your blind, make sure you know which drill bit is required for your surface (plasterboard, timber or masonry).
Make sure you have clean hands and wipe down any surface area that is going to come in contact with the blind (our install partners use plastic disposable gloves). Blind fabric is susceptible to marking from dirt, dust and oils so please be careful when you install your blind.
Finally it’s important to note that you should not install your blind on a surface with water damage, rotting or any other damage.
 Step 1:
Unpack your order and lay it out in front of the window where the blind is being installed.
You should have two different brackets, a pin-end bracket and a control-end bracket. The control-end bracket must be on the side that you want the chain control. The brackets will fix your blind to the face of the window (face fitting) or the top of the window recess (recess fitting), depending on what you selected when you placed your order.
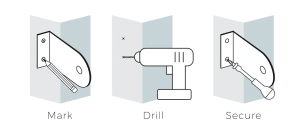 Step 2:
Mark where your pilot holes will be by placing the bracket against the wall where you want it to go and use a pencil to mark where you will be inserting the screws. Drill pilot holes for timber screws or appropriate sized holes for your plasterboard anchors or masonry plugs. If you are using anchors or plugs, once you have drilled appropriate size holes you will need to gently tap them into the plasterboard or concrete/brick first. Screw the bracket into place. Complete the process for both sides.
PLEASE NOTE: the brackets must be level. Use a level to confirm when you mark your pilot holes, and again after you screw the brackets into place.
 Step 3:
Once the brackets have been screwed into place, locate the control end of the blind (the end with the chain control) and insert it into the control-end bracket. Position the blind so that the chain hangs freely and will not rub on the chain cover when you raise and lower your blind. Turn the plastic cover on the pin end of the blind anti-clockwise to retract the pin, slot the pin into the notch on the pin end bracket, and then turn the plastic cover clockwise to extend the pin and lock the blind in place.
PLEASE NOTE: ensure that the blind is rolled up when fitting the blind into the brackets.
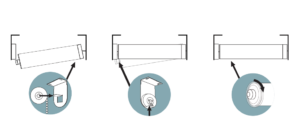
 Step 4:
PLEASE READ THE FOLLOWING POINT REGARDING CHILD SAFETY:
All blinds include a child safety device which must be used. In Australia this is required by law.
When attaching the chain safety device, allow the chain to drop to its natural height and screw the child safety device to the wall or frame under a small amount of tension. It is important that once fixed the chain is reasonably taut.
For more information visit the ACCC’s webpage on the installation of corded internal window coverings.
Step 5:
Test the blind by lowering and raising it a couple of times.
Congratulations, you have successfully installed your blind!